When developing software, there are usually two types of requirements: functional requirements, which are what your application is supposed to do, such as solving a business need or providing business functionality, and non-functional requirements, which may include security, usability, logging, and other requirements.
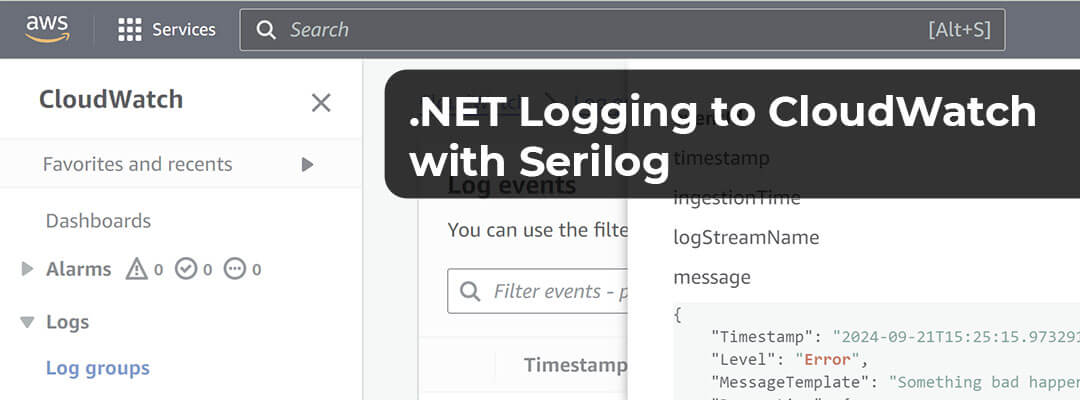
Considering that modern applications are running in clouds, without physical access, and with very limited remote access, logging is a crucial part of non-functional requirements because sometimes that is the only way to understand what is wrong with the application and whether it is even running. In this article, we talk about AWS-hosted cloud applications and Amazon’s CloudWatch Logs solution.
Table of Contents
AWS logging options for .NET Developers
What is CloudWatch, and what it can do for AWS users?
How much does the AWS CloudWatch log cost?
Logging to CloudWatch from a C# / .NET Core application.
Configuring AWS CloudWatch logs.
Sending logs to CloudWatch with AWS.Logger.SerLog Nuget package
Sending logs to CloudWatch with Serilog.Sinks.AwsCloudWatch
AWS CloudWatch Logs Insights. Querying and analyzing logs.
IAM Access Credentials for sending logs to AWS CloudWatch.
Which Nuget library to choose?
YouTube video.
Get in touch!
AWS logging options for .NET Developers
When looking for logging options for AWS-hosted applications, developers have many options, starting from the easiest, like saving logs on a virtual machine’s hard drive or writing to a database or S3 bucket, to more advanced ones, such as Amazon CloudWatch or third-party systems on AWS Marketplace.
While simple options may work great for somebody, they are limited, especially when the application grows, for example, when you have a distributed solution with multiple microservices hosted in multiple instances. In that case, logging to the Virtual machine’s hard drive becomes unusable because, in case of any issues, you need to collect logs from all machines to find out what is happening; practically, that would be impossible. Logging to the database may be better in such cases, but at some point, the logging load may be so high that you must keep increasing the DB size or place a queueing mechanism in front, making the solution too complex and costly. Typically, for distributed applications, you need something like the ELK stack (Elastic search, Logstash, Kibana). The ELK stack works excellent for microservice architecture, is affordable, and is easy to use when querying logs.
However, when hosting on AWS, a better option is an AWS-provided solution for logging: CloudWatch. CloudWatch provides a lot of useful functionality, and it is cost-effective, easy to use, and native to AWS.
Below, I will show how you can get started with CloudWatch for logging from your .NET Core / C# application, what configuration you need to do in your AWS account, and what you can do with all the logs later, for example, when investigating a production issue.
What is CloudWatch, and what it can do for AWS users?
Amazon CloudWatch is not just an AWS log service but a complete monitoring system for your application, infrastructure, services, and networks in AWS. It’s a powerful tool that allows you to set alarms, automate actions, aggregate data, and respond to metric changes. For example, you can set up an Auto Scaling workflow to add an EC2 instance when CPU utilization increases.
However, in our case, we are interested only in CloudWatch’s Logging capabilities and how to write/read logs there.
How much does the AWS CloudWatch log cost?
One of the most important rules/practices when working with a new cloud service is to understand how much it will cost you. You do not want to be in a position when you start using some services and a week later realize that you chose an incorrect instance size or that the service itself is too expensive, and you already owe Amazon a couple of thousand dollars.
Nevertheless, using CloudWatch logging is generally quite affordable. You pay for the log storage, and the price depends on your storage type. Even if you opt for the most expensive Standard type, the price is only $0.50 per GB. The monthly cost should be manageable unless you have a very high-load application. Additionally, you can utilize the Infrequent Access tier, which is half the price of the Standard tier at $0.25 per GB. However, logs are just one component of CloudWatch. To explore all CloudWatch fees, visit its pricing page.
Logging to CloudWatch from a C# / .NET Core application.
As a Microsoft .NET Developer, using C # and the latest .NET core is the most convenient language for me, so we are going to create a simple xUnit Test application and log directly to AWS CloudWatch from a local machine.
For application logging, I will use Serilog, the de facto standard logging library for .NET applications, and show two Nuget packages you can use with Serilog. One is AWS.Logger.SerLog, developed by the AWS team, and another is Serilog.Sinks.AwsCloudWatch, which is created by a company called Cimpress.
Configuring AWS CloudWatch logs.
First, you need to create a log group in the AWS CloudWatch console. Log group is a logical storage for your logs. Below are the guidelines for naming log groups. There is no standard naming convention, so you can name them as you want, but a starting point may be something like /app-name/component-name. That is useful when you have multiple instances of the same components (microservices), as it is later easy to investigate and search through the logs because they are in the same location. In our case, we are going to write at /yaplex/cloudwatch-demo/hello-world-api
Follow these guidelines when naming a log group:
- Log group names must be unique within a Region for an AWS account.
- Log group names can be between 1 and 512 characters long.
- Log group names consist of the following characters: a-z, A-Z, 0-9, ‘_’ (underscore), ‘-‘ (hyphen), ‘/’ (forward slash), ‘.’ (period), and ‘#’ (number sign).
Retention settings directly affect pricing, so you need to find a balance between keeping logs long enough to investigate production issues and, at the same time, keeping your pricing down. From my experience as an independent contractor who works with AWS, I know that you need at least six months of logs available. That is the longest period of time I had to go back to investigate defects; however, if you rely on some metrics, for example, the Black Friday sales event, you may need to store logs for longer, or if your app is related to financial information, you may have a legal requirement to store them for up to seven years. In the case of our demo application, we will keep them for one week only.
Log class affects the pricing and number of features available. There is a Standard and Infrequent classes. The Standard class costs twice as much ($0.50 per GB). Still, it provides many more features, such as Live Tail, Anomaly Detection, sensitive data protection, etc. For our demo app, we will choose Standard; however, in production, you can have multiple log groups, one with Standard class and a short log retention period. Second is the Infriquent class and a more extended log retention period; in that case, you will have all the features for Standard but the cost optimization of the Infriquent class.


Sending logs to CloudWatch with AWS.Logger.SerLog Nuget package
Configuring Serilog to send logs to AWS CloudWatch is easy. All you need is the Log Group name, Region, and AWS credentials, such as the access key and secret key (you can scroll down to find out how to create such credentials).
Below is the C# code as part of the xUnit test library, which contains all information on how to write into CloudWatch using AWS.Logger.SeriLog Nuget package
[Fact]
public void Writing_Logs_With_AwsLoggerSerilog()
{
	string accessKey = "XXXXXXXXXXXXXXX";
	string secretKey = "xxxxxxxxxxxxxxxxxxxxxxxxxxxx";
	string logGroup = "/yaplex/cloudwatch-demo/hello-world-api";
	string logStreamPrefix = "AWS.Logger.SeriLog";

	AWSLoggerConfig configuration = new AWSLoggerConfig();
	configuration.Region = Amazon.RegionEndpoint.USEast1.SystemName;
	configuration.Credentials = new BasicAWSCredentials(accessKey, secretKey);
	configuration.LogGroup = logGroup;
	configuration.LogStreamNamePrefix = logStreamPrefix;

	using var log = new LoggerConfiguration()
		.MinimumLevel.Verbose()
		.WriteTo.Console()
		.WriteTo.AWSSeriLog(configuration, textFormatter: new JsonFormatter())
		.CreateLogger();

	var user = new { FName = "Alex", LName = "Shapovalov" };

	log.Verbose("Hello World, this is Verbose message... {@user}", user);
	log.Information("Hi there!I am information message. {@user}", user);
	log.Warning("Careful, this is a warning! {@user}", user);
	log.Error("Something bad happen with the application! {@user}", user);
}
Pay attention to the textFormatter property because you will not see the Reach Properties in your output if you don’t let Serilog know to use Json Formatter. The output will be like the screenshot below; for example, the message does not indicate LogLevel anywhere.


Sending logs to CloudWatch with Serilog.Sinks.AwsCloudWatch
[Fact]
public void Writing_Logs_With_SerilogSinksCloudwatch()
{
	string accessKey = "XXXXXXXXXXXXXXXX";
	string secretKey = "xxxxxxxxxxxxxxxxxxxxxxxxxx";
	string logGroup = "/yaplex/cloudwatch-demo/hello-world-api";
	string logStreamPrefix = "Serilog.Sinks.AwsCloudWatch";

	var client = new AmazonCloudWatchLogsClient(new BasicAWSCredentials(accessKey, secretKey), Amazon.RegionEndpoint.USEast1);

	using var log = new LoggerConfiguration()
		.MinimumLevel.Verbose()
		.WriteTo.Console()
		.WriteTo.AmazonCloudWatch(
			logGroup: logGroup,
			logStreamPrefix: logStreamPrefix,
			restrictedToMinimumLevel: Serilog.Events.LogEventLevel.Verbose,
			cloudWatchClient: client)
		.CreateLogger();


	var user = new { FName = "Alex", LName = "Shapovalov" };

	log.Verbose("Hello World, this is Verbose message... {@user}", user);
	log.Information("Hi there!I am information message. {@user}", user);
	log.Warning("Careful, this is a warning! {@user}", user);
	log.Error("Something bad happen with the application! {@user}", user);
}

AWS CloudWatch Logs Insights. Querying and analyzing logs.
Writing logs in AWS CloudWatch makes sense only if you want to query them one day, which is possible from the “Log Insights” page. You can write queries and apply necessary filtering to logs to find the information you need; for example, if you want to see all errors, you can filter “message” with “error” text in it. In addition, when looking for logs at a specific time, for example, the last 10 minutes, you can use the button at the top of the UI to show how old the logs should be.
Also, when querying logs for multiple microservices, you can choose numerous (up to 50) log groups and search for a specific CorrelationID to see all related messages.
fields @timestamp, @message, @logStream, @log
| filter @message like /Error/
| sort @timestamp desc
| limit 10000

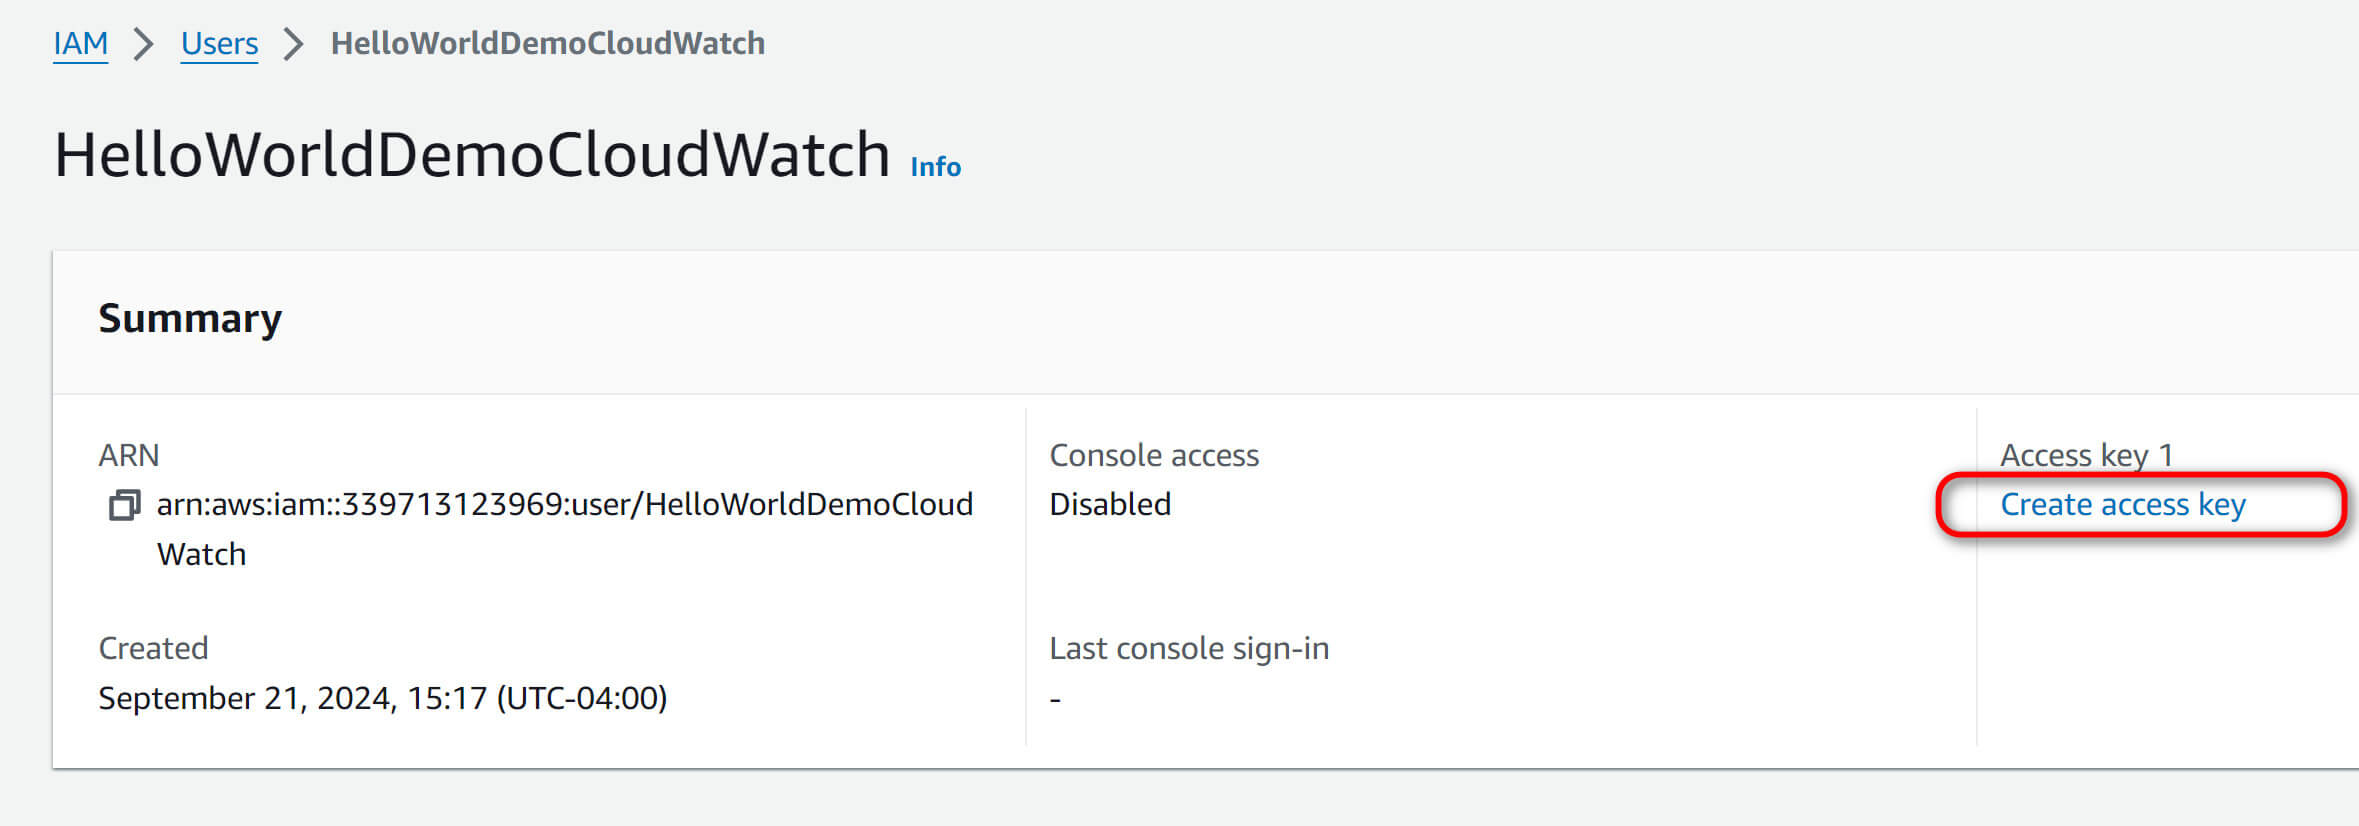
IAM Access Credentials for sending logs to AWS CloudWatch.
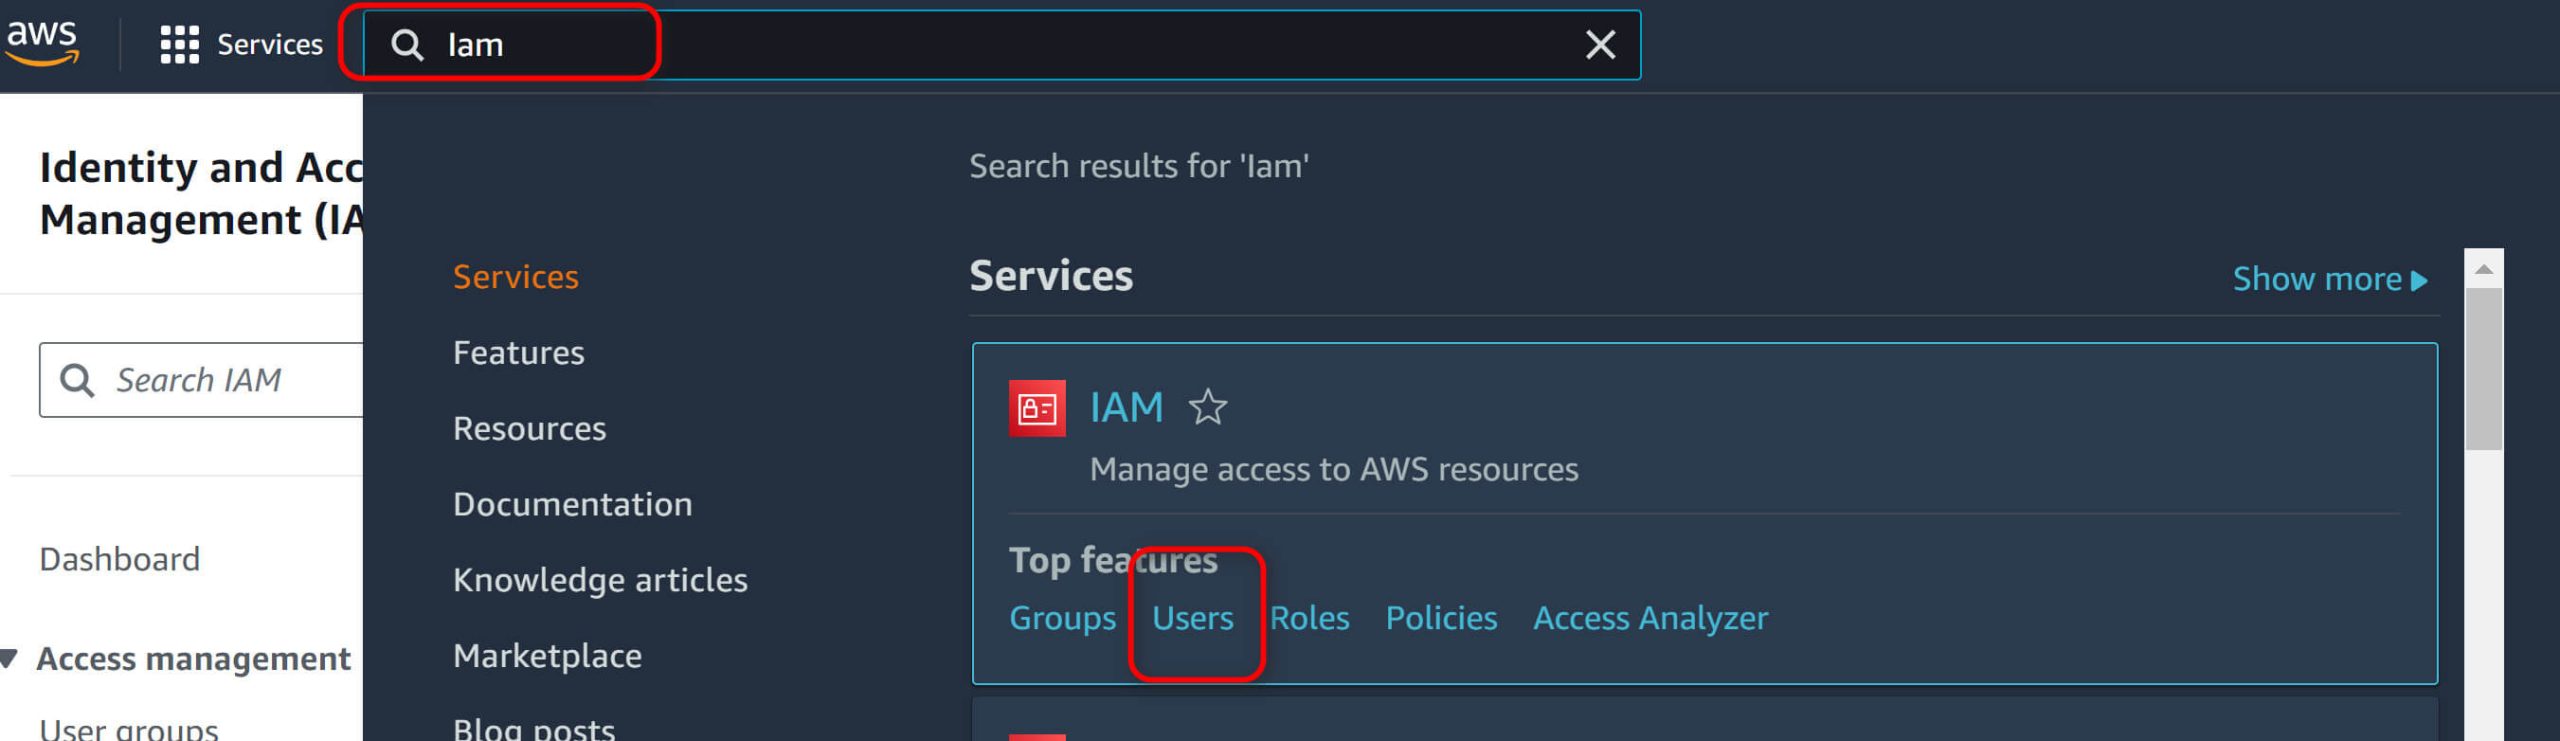
To create access keys, first, you need to create a user to which the key will be assigned.
- To create credentials, open the IAM -> Users page by typing “IAM” in the search box and clicking “Users.”
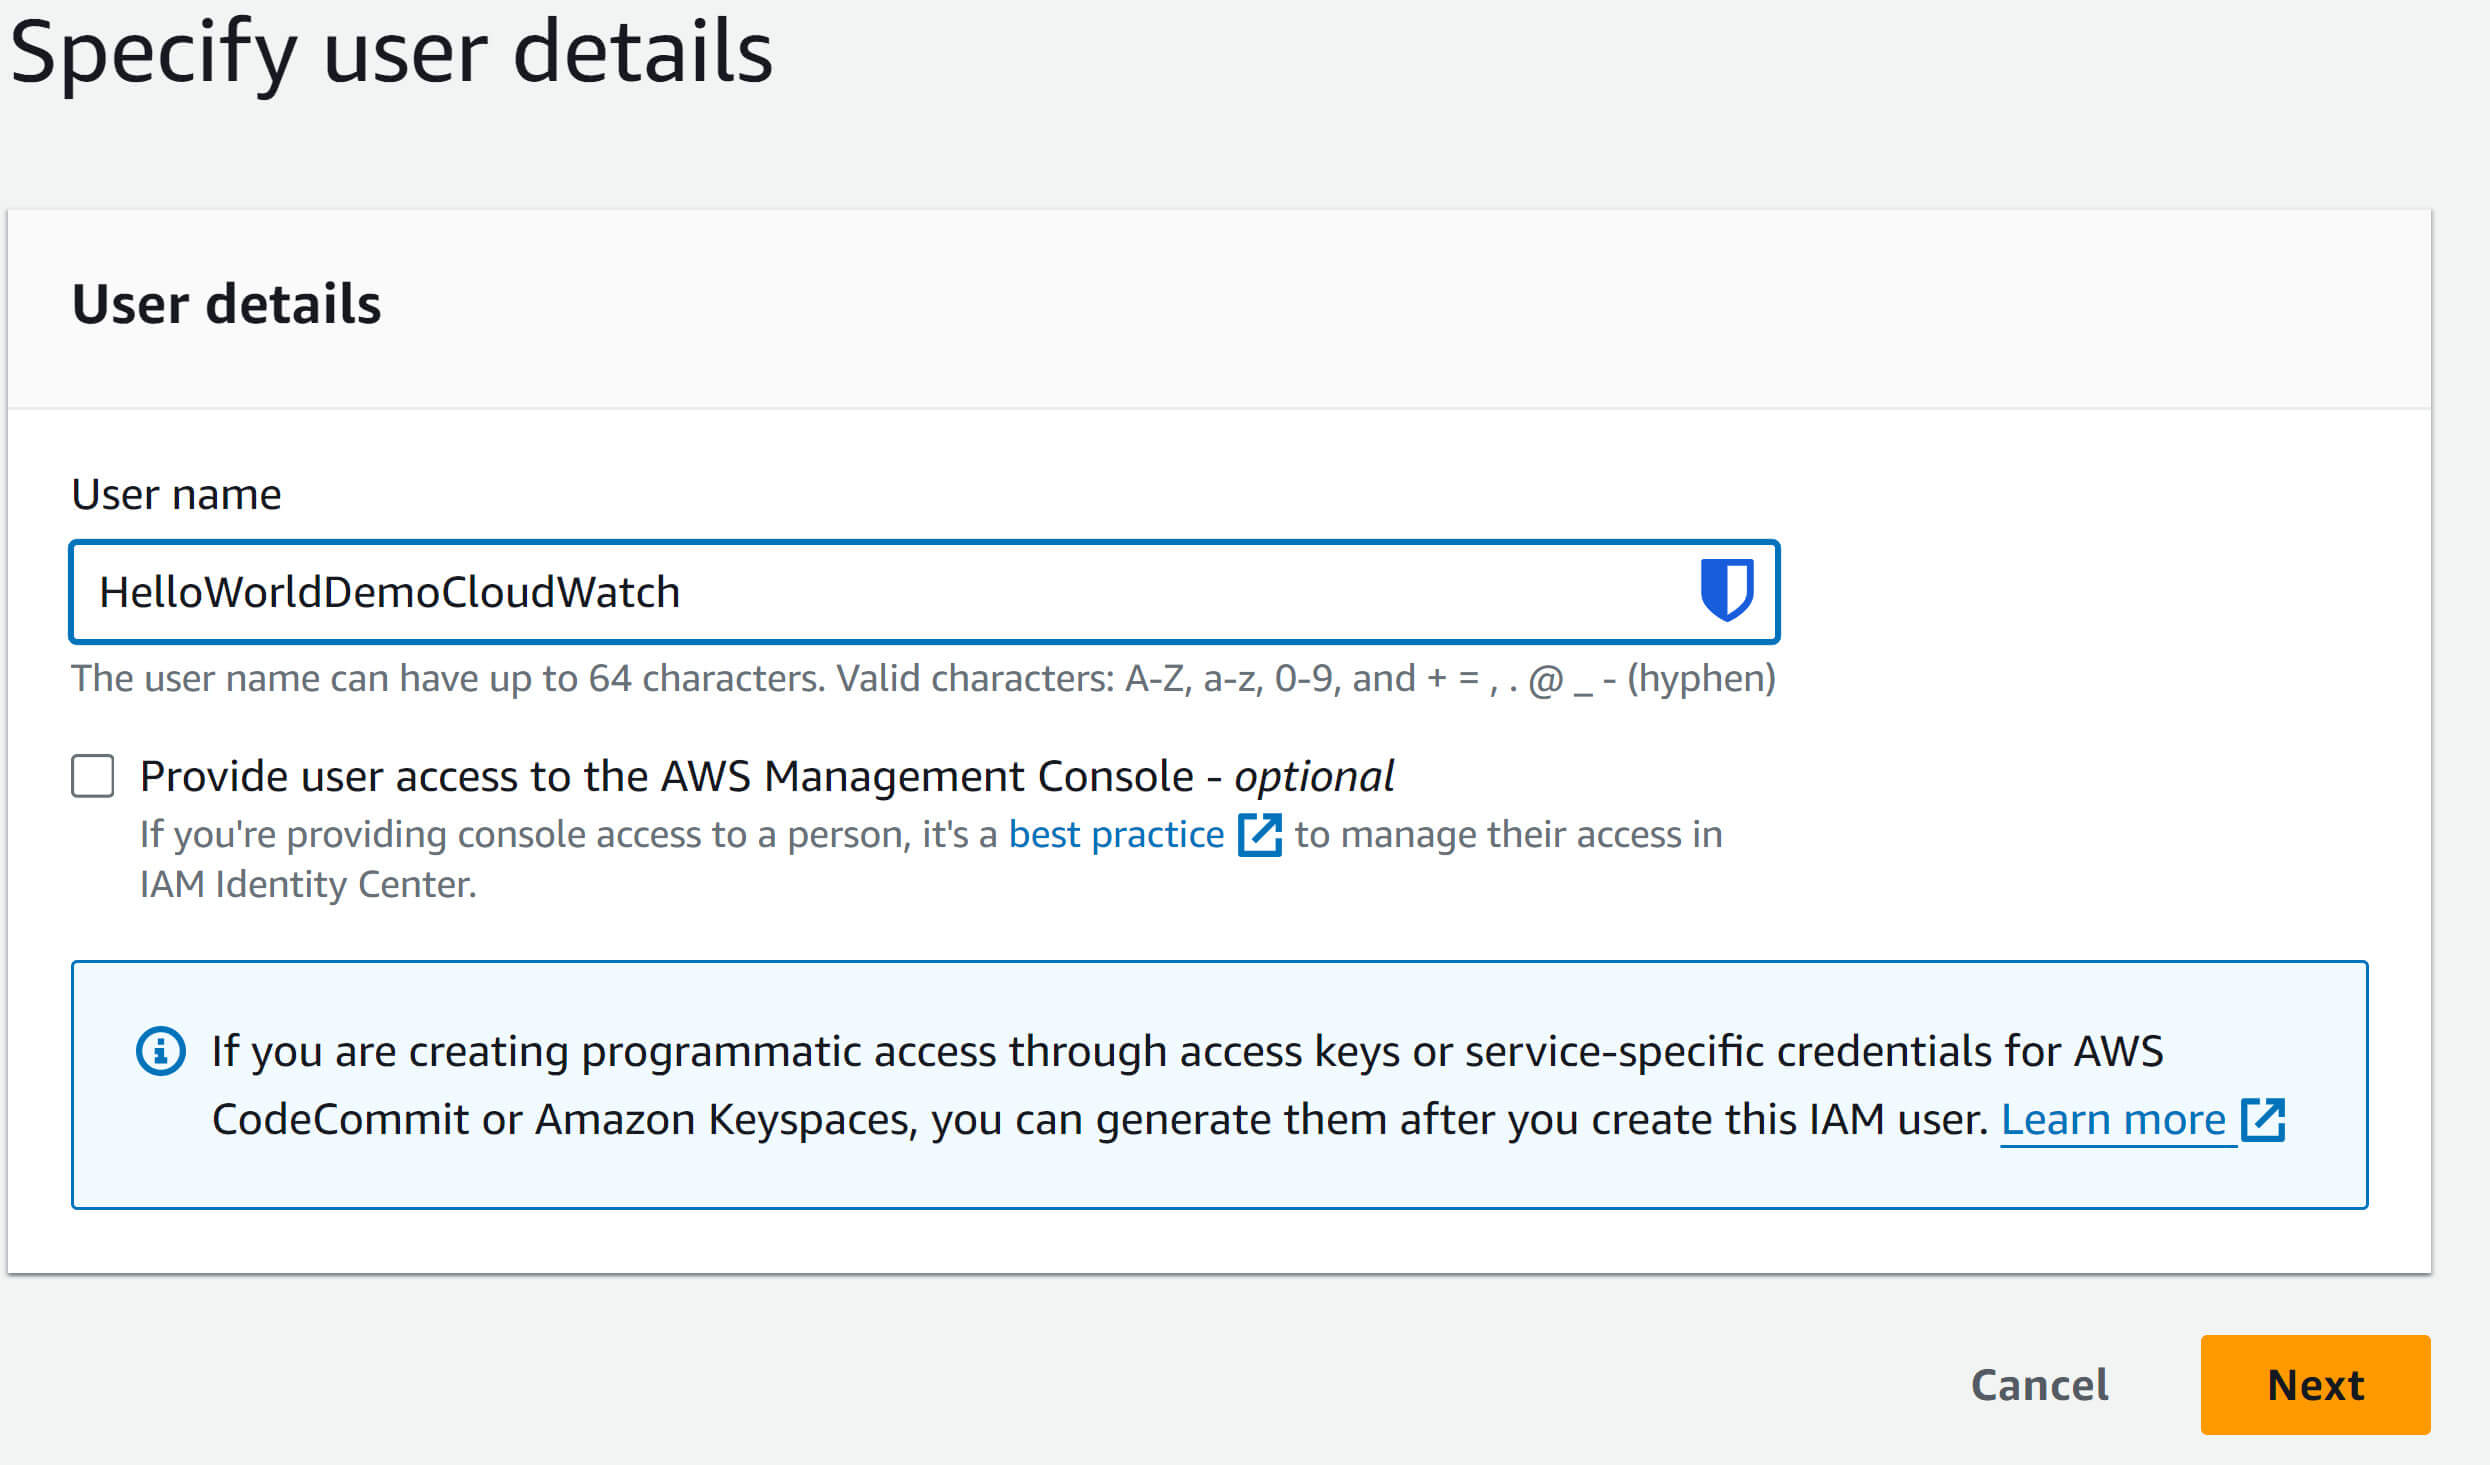
- Next, click Create, and provide a user name, “HelloWorldDemoCloudWatch.”
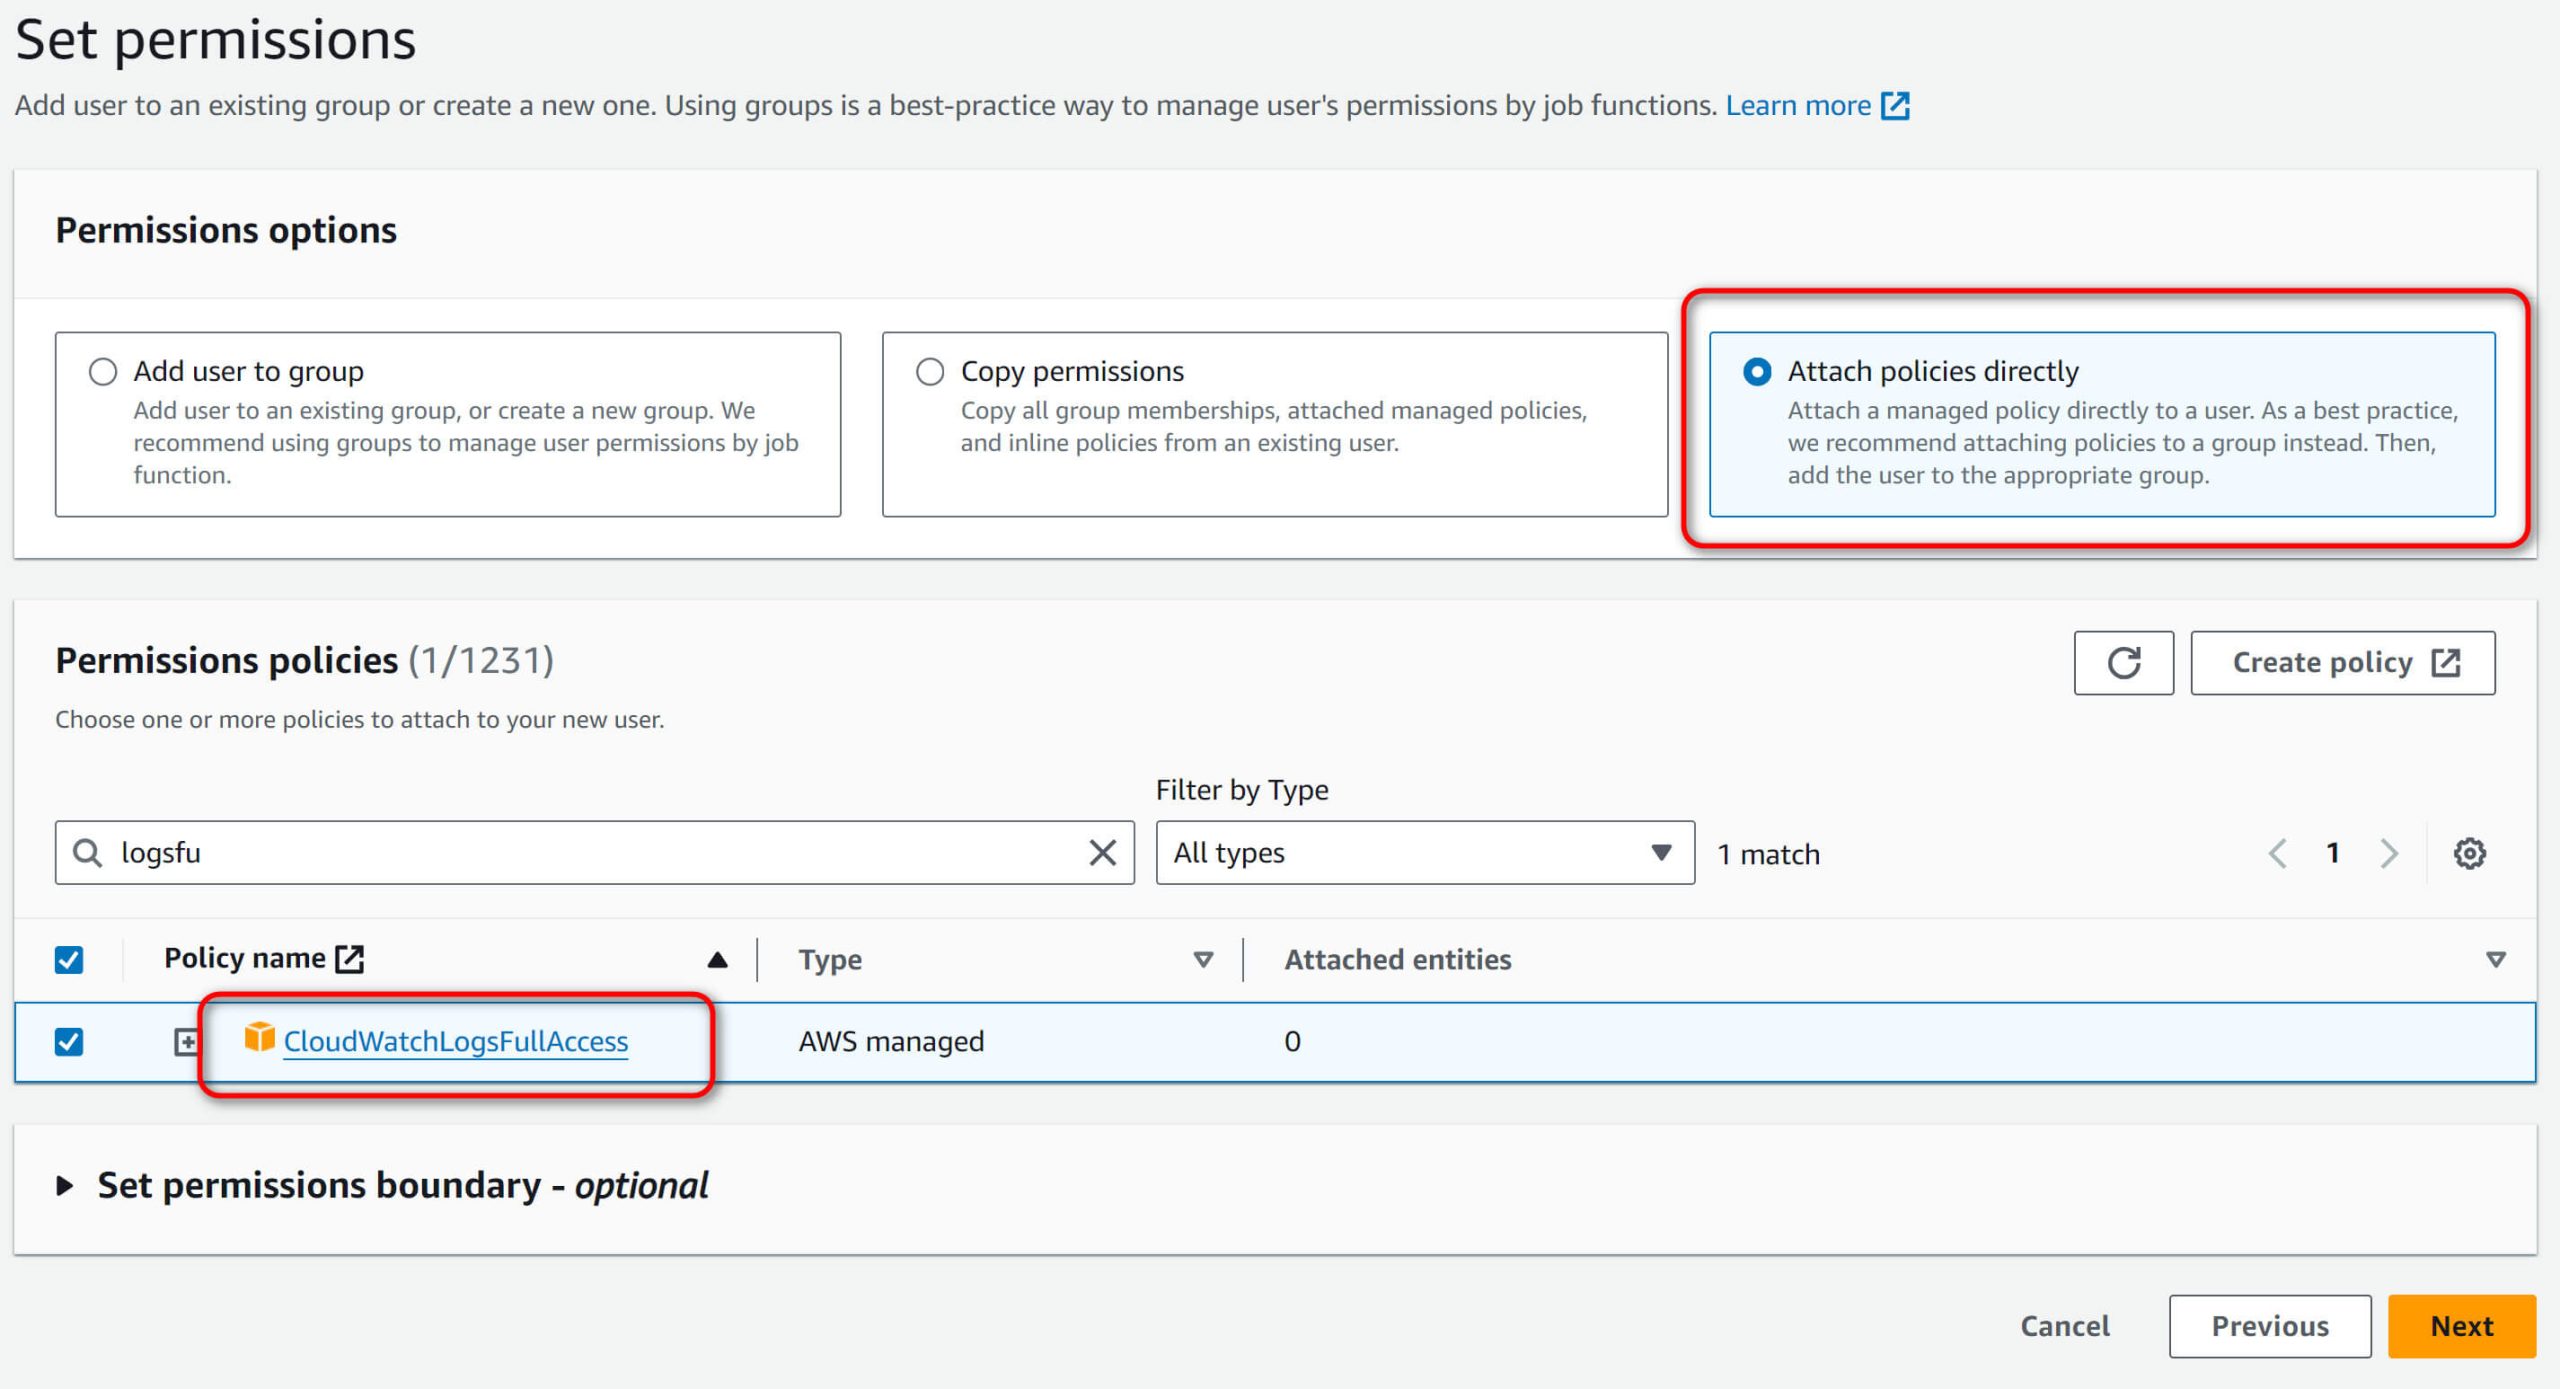
- We should follow the least privileged security practice, so we want to limit that user to only accessing logs in CloudWatch and nothing else. So, choose the policy name “CloudWatchLogsFullAccess.”
- Review the information and press “Create user.”

Once the user is created, you can proceed with access key creation.
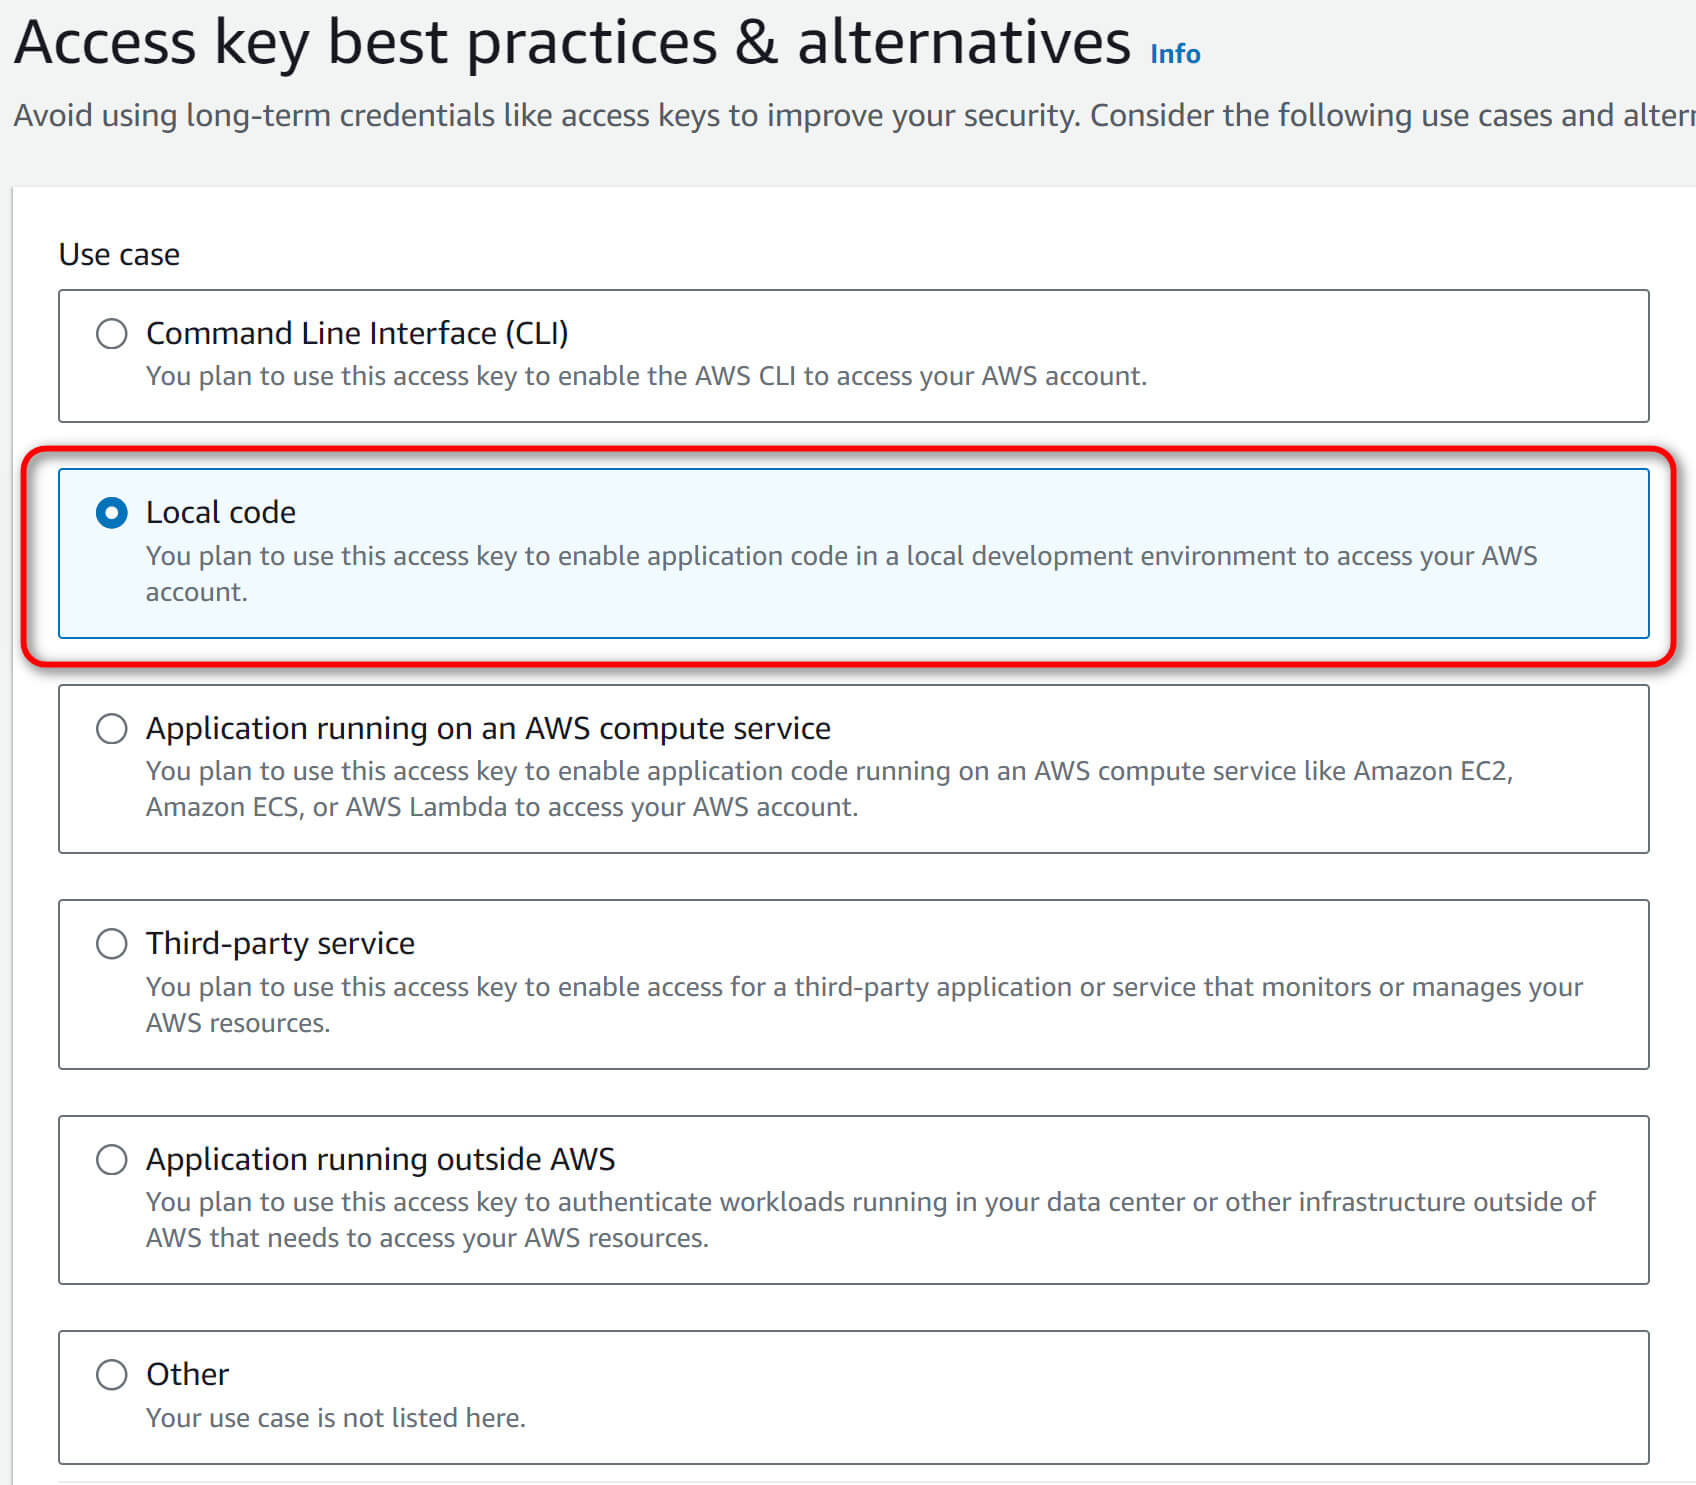
- Now open the newly created user and click “Create Access Key.”
- We are using that demo application on our local environment, so we need the “Local Code” access key, but if you want to run it in production, choose the appropriate setting.
- Make sure you save your access key and Secret because you will not be able to see the Secret again.

Which Nuget library to choose?
If you do not know which library to choose to send logs to CloudWatch, I suggest going with the Serilog.Sinks.AwsCloudWatch. Even if both libraries perform the same, the Serilog.Sinks.AwsCloudWatch seems easy to configure, is more popular with developers, and updates more often.
I hope this information was useful and helps you get started with AWS CloudWatch logging for your .NET applications. Feel free to check other articles to learn more about software development or subscribe to this blog’s RSS feed.
Get in touch!
This site is protected by reCAPTCHA and the Google Privacy Policy and Terms of Service apply.

Alex Shapovalov is an independent contractor and founder of Yaplex – a Canadian custom software development company. Alex is a seasoned full-stack Software Developer who provides software development services in Canada and the USA.